Fire Alarm 2 AM
Do we get extra IHG (Holiday Inn) bonus points for living through the 2 AM false fire alarm last night? NOT FUN. Hope I can drive home this afternoon without falling asleep.
Check out my new TESTING page where I hope to continue testing new features. Also, be sure to have a look at my new HIKES site and especially some of the “highlighted” hikes that are listed in bold there.
Note that HIKES used to be a “section” here, but there are a lot of them so I made a site just for them.
Do we get extra IHG (Holiday Inn) bonus points for living through the 2 AM false fire alarm last night? NOT FUN. Hope I can drive home this afternoon without falling asleep.
Arrived in Vermillion, South Dakota, last evening about 6:30 PM and went straight to dinner at the “Old Lumber Company” downtown. Checked in to our hotel adjacent to the Univ. of South Dakota campus at about 7:15 PM and went to find the music department building (the fine arts center) where Christine will be taking classes for the rest of the week.
While she’s in class I’ll be working from my hotel room here, or maybe from the USD library.
This afternoon I’m adding https://digital.grinnell.edu (site ID is 17) to my own Matomo instance and I’m prompted to upgrade PHP on that Matomo droplet (DigitalOcean). I did so quite easily following Upgrade PHP from 7.2 to 7.4 on CentOS 8 and Apache. I’ve also updated my Drupal version, and some modules, in https://digital.grinnell.edu along with adding the matomo module, but that module is now reporting:
    The validation of "http://analytics.summittservices.com/matomo.php" failed with error "Error opening socket ssl://analytics.summittservices.com:443" (HTTP code 0).
    The validation of "https://analytics.summittservices.com/matomo.php" failed with error "Error opening socket ssl://analytics.summittservices.com:443" (HTTP code 0).
Hmmm…wonder what’s up with that?
Continue Reading »Arrived at Fisherman’s Corner campground in Hampton, IL, on Thursday evening and went on my first Iowa.LandShark geo-bike ride yesterday. Somewhere between 18-22 miles of geocaching along the Mississippi River from Moline to Davenport and Rock Island. Open my track log to see where Gossamar and I went.

This morning I started an experiment… clipping leaves (“lobes” might be a better term for these things) from a healthy, indoor Sempervivum tectorum. What’s that, you ask? The common name is Hens and Chicks.
A couple of weeks ago I bought an on-sale strawberry pot full of Sempervivum tectorum and I have it growing on a little table on the front porch. It’s doing QUITE WELL there! A couple of days ago I uprooted a 3 foot square patch of Snow on the Mountain from a spot in my front flower beds (outside out southeast bedroom window), and that left a big bare patch of soil to be dealt with.
Continue Reading »This morning I found some new Streamlit resources from developer Jcharis, and I forked his Jcharis/Streamlit_DataScience_Apps to make my own copy at SummittDweller/Streamlit_DataScience_Apps
Now I’m going to try and get the component Simple_CRuD_Blog_App_with_Streamlit working locally as a proof-of-concept. Since I can’t “clone” the single project repo, and a “sparse checkout” seems wasteful since I’ll never push back to the original project, I’m going to git init an entirely new local named simple-CRuD-blog-app-with-streamlit and just copy/paste the contents.
It works!
Just the other day I got an updated copy of the Wieting Theatre’s volunteer roster and assignment schedule. As I’m trying to post them to the theatre’s management website (it’s password protected) I keep having issues with npm and dependencies that won’t compile. The fix, thus far has included a local command stream like this:
cd wieting-guild-pages
git pull
code .
npm run build
npm run start
  --> failed
npm update
npm audit fix
npm run build
npm run start
  --> failed
npm audit fix --force
npm run build
  --> failed
npm install axios
npm run build
  --> failed
npm update
npm run build
The last errors had this in common:
Continue Reading »I’ve got Mackenzie looking at Streamlit as a means of building a mobile-friendly app that I can use to create posts like this one. That app will need to allow me to edit a TITLE and Markdown BODY fields, capture location and time, and post all of that information to my personal blog… preferably from my cell phone. I’ve captured some possible resources and guidance in https://www.one-tab.com/page/71iaDADxT-eLEOx15qeVnQ.
Went to the elementary early this evening and sprayed Weed-B-Gone around the bench and area. I hope it knocks the remaining weeds there back. There was no wind and no rain thus far, so I hope it works.

Geowoodstock 2023 (GC89GMX) and Kentucky’s oldest surviving geocache (GC39E) were the intended destinations of another epic roadtrip with gossamar on May 25-28, 2023.
The route and cache count looked something like this:
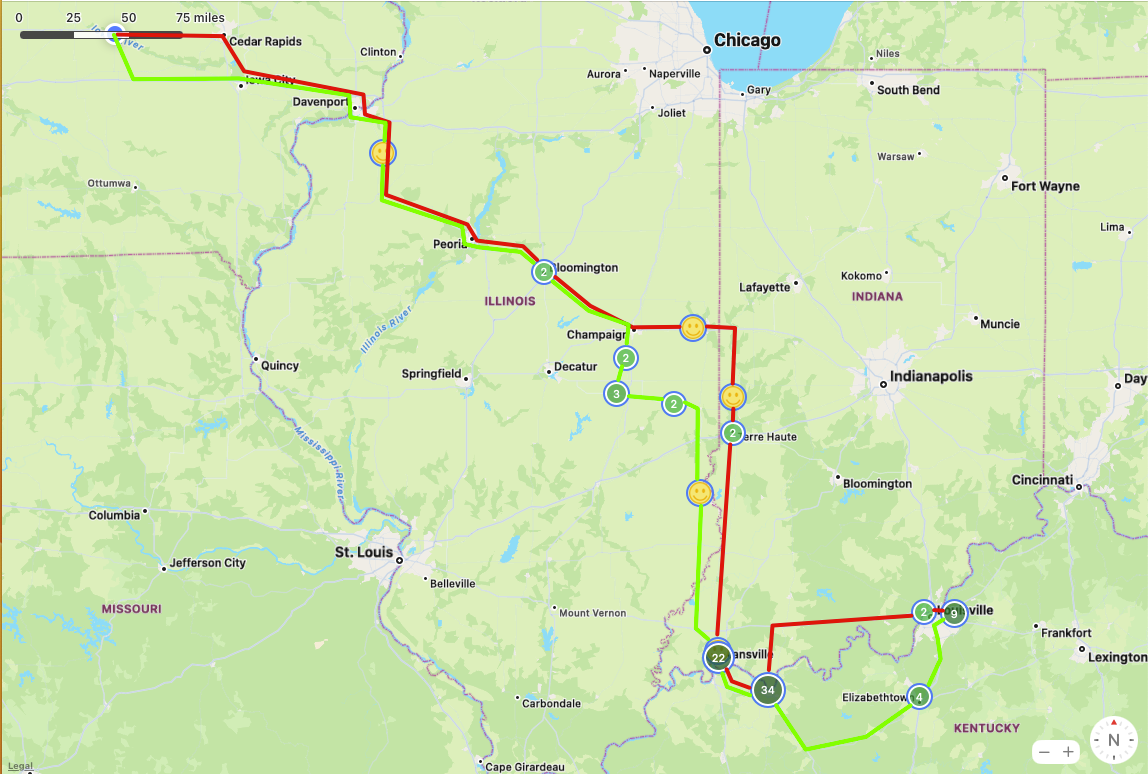
The green lines represent my “outbound” route while the red lines show my “return” route back from GC39E. The ordered list of caches and events found is available for download below.
Continue Reading »